Cart 0

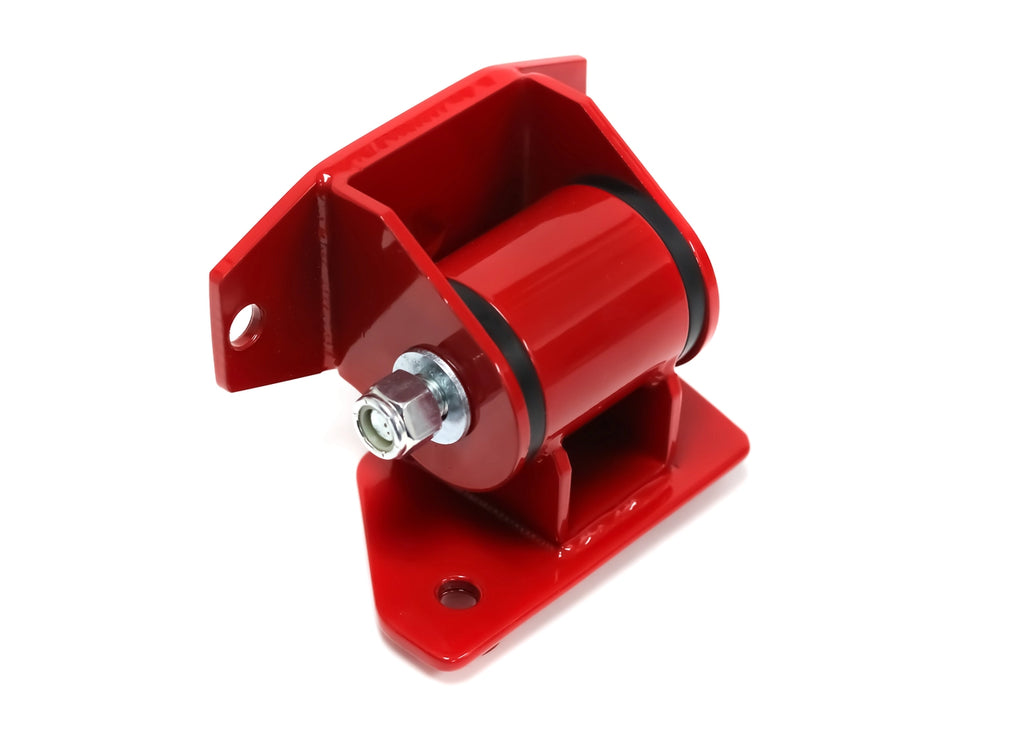
AWR Racing Rear Diff Mount 2020+ Explorer ST *FREE SHIPPING*

$ 279.99
<

AWR Racing is beyond excited to release our highly requested Ford Explorer ST rear differential mount. This mount is proudly made in the USA. Designed, machined, built, tested, and shipped from San Diego, California. This one of a kind laser cut and CNC folded part is tig welded at our headquarters, provided with 88 durometer Energy Suspension polyurethane bushings, and powder coated gloss black or gloss red for a very durable finish.  

Why is this part beneficial? Initially Ford mounted the rear differential with 4 large rubber bushings but eliminated the right rear bushing during production of the ST and base model vehicles. Why? Maybe it was a cost cutting procedure but over the years it has created traction launching issues, durability issues, as well as hardware failures for many ST owners. With the possibility of the OEM bolt breaking, this could contribute to a huge and expensive fix. Solve all these problems and worries with AWR Racing’s differential mount.  

AWR’s design is easy to install. There is no drilling or modifications of the subframe or differential housing required! This mount comes complete and ready to install with all hardware included. No lift or jack is required, install this in your garage with the correct tools and you are good to go! 

Included with order: 

  • Gloss black or Gloss red AWR Racing differential mount

  • Energy Suspension polyurethane bushings in 88 durometer

  • Nickel plated nut plate

  • Installation hardware

  • Installation guide

This diff mount is a must have for every Explorer ST owner. There is no substitute for the quality, design, and benefits this piece transfers to your vehicle. Feel the support, smoother launches, security, and additional benefits once the mount is installed. 

Application: 

2020 - 2022 Ford Explorer ST

Note* AWR Racing’s diff mount can also be used on 2020 and early 2021 ST's with all 4 bushings for added strength during hard launches/acceleration. 

Lifetime warranty on steel fabricated unit.

*FREE SHIPPING in the continental USA only

AWR Racing Explorer ST Differential Mount Install
Caution: The vehicle components may be hot to the touch if you recently drove the car. It is
recommended to allow components to cool off before attempting this installation.
Tools Needed: 13mm 12 point box wrench, 14 mm socket, 3/4" socket and box wrench, rubber
mallet, alignment punch.
1. Remove the bottom bolt to the right of the drain plug on the differential cover as
well as the differential cover bolt that is on the right side at the 3 o’clock position.
2. Begin by Installing the nut plate into the frame rail by holding the small bent tab.
Insert the nut plate into the middle subframe hole with the smooth side facing
down towards the ground.
Note* This tab should be hanging down and to the driver side of the
vehicle out of the hole it was put through.

3. Thread the passenger side bolt temporarily to retain the nut plate in place.
4. Install frame bracket. Align the frame bracket with the left side bolt and loosely
fasten the left side of the bracket.
5. Remove the right side bolt that retained the nut plate. Pivot the bracket into place
and re-insert the bolt.
6. Once both bolts are connected hand tighten the bolts so the bracket can be
re-positioned if necessary.
7. Now install the differential bracket in between the ears of the frame bracket and
use the alignment tool to position the ears and the bushing.
8. With the alignment tool holding together the two pieces, start by inserting the
upper 3 o’clock bolt to the differential.
Note* Removing and Installing the upper differential housing bolt may be
tricky as the bolt is slightly longer than the area to remove it allows. Slip the bolt into the

mount first and finesse the upper bolt into place. Once in place, proceed to install the
lower housing bolt.
9. Remove the alignment tool and install the thru-bolt into the differential mount.
Push the bolt in from the left side, washers included on both sides. Install the
nylock nut.
10.Tighten both frame bolts with the 14mm socket to 40 ft lbs.
11. Tighten the differential housing bolts with the 13mm 12 point box wrench.
12. Lastly, torque the thru-bolt to 60 - 65 ft lbs.
13.Once mount install is completed, double check that all fasteners are tight. Take
your ride out and enjoy!


Customer Reviews

Based on 1 review Write a review


More from this collection